Saturday, September 03, 2011

Kurohyou 2 announced


As you can see, Kurohyou 2 and Yakuza 5 have been announced from the Ryu Ga Gotoku Studio.

I haven't made a post in so long it makes me feel like I should go back and update some things. Who imported Kurohyou and needs something posted?

I love Kamuro-cho but seriously, OSAKA!!


Wednesday, May 27, 2009

MGS Screensaver


Hey guys, did anyone else see the MGS teaser site and think that the rain would make an awesome screensaver? If you did you'll be happy to know I compiled a quick one. It doesn't contain the countdown, just the rain and lightning.

The file can be downloaded using the Mirror below.

Rapidshare Mirror

Friday, March 06, 2009

Yakuza 3 Maps

Here are translations of the maps of Kamuro and Ryukyugai from Ryu Ga Gotoku 3 (龍が如く3) or Yakuza 3 as it is being called by the west. The original maps (in Japanese) are available from Sega's Ryu Ga Gotoku website. 

Let me know if you find any errors in my translations.

Friday, August 08, 2008

Sunday, July 20, 2008

PSP Wallpapers

Just thought I would add a few PSP wallpapers to the site, and if they prove to be popular expect more to come.
Bit of a private joke with this one.
-Heres a few game developers and some Sony logos over time.

Saturday, June 21, 2008

How To Upgrade Your PS3 Hard Drive

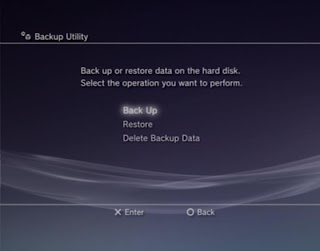
Step 1: Go out and buy a 2.5" SATA laptop hard drive. For this upgrade I have used a Fujitsu 250GB Sata.

Step 2: If you want to keep all of the information currently on your PS3 hard drive, You will need an external hard drive to backup the Data. The PS3 has it's own backup utility, which is very handy. The external hard drive will need to be formatted into FAT32 so that the PS3 can move data onto it. To format the Drive use a program called SwissKnife. Install it, and run the program.

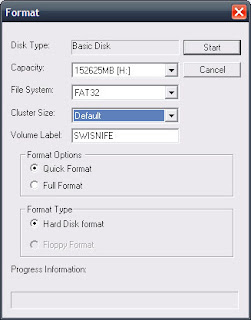
Step 3: Once your external hard drive is in the proper format of FAT32, plug it into the PS3 and go to the Backup Utility under the Settings menu of the XMB, and follow the prompts.

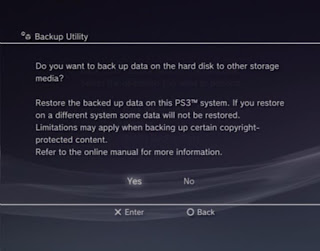
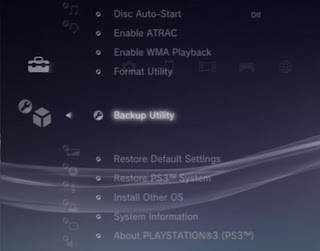
Step 4: Choose your USB to Backup the data.

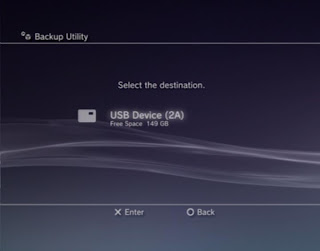
(The process took rougly 40 minutes)

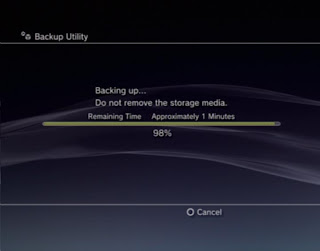
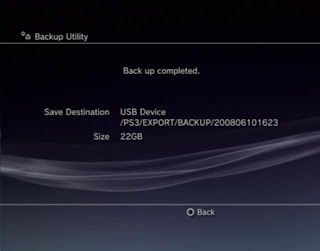
Step 5: Once the backup is complete, turn off the PS3 and unplug it.

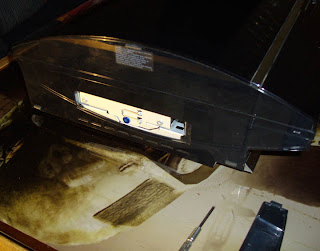
Step 6: On the left of the PS3 is the Hard Drive Bay. Use a flathead to remove the cover with ease. Once off, a blue screw is visible. This needs to be unscrewed to remove the Hard Drive. Be careful with the screws in the PS3 as they strip very easily.
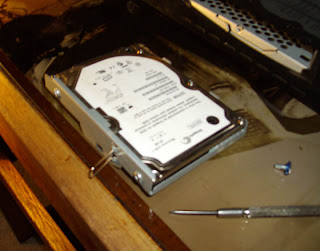
Step 7: Remove the Hard Drive with the metal tab (visible below) and unscrew it from the frame. Then Replace the new Hard Drive in the slot.
Step 8: Slide the Hard Drive back into the PS3 and then push it to the left so it connects to its ports. Replace the blue screw and then the cover.

Step 9: Plug in and turn on the PS3. It will ask you to format the new drive.

Step 10: Once formatted, plug in your external Hard Drive with the PS3 backup data. Return to the Backup Utility, and this time select the Restore option. Once this is done all your data will be restored to its previous settings.

Complete!
(Note: Replacing the Hard Drive does not void your warranty)

Friday, June 20, 2008

How To Access The Japanese Playstation Store

You don't need to enter any Japanese characters to gain access to the Japanese Playstation Store. I've tried to make this as simple as possible, which is why there is an image for every step.

Step 1.
Go to the far left and Create a New User.


Step 2.
Log in as the New User. In this case I have used JapanStore as the name.


Step 3.
Move to sign up for Playstation Network.


Step 4.
Create a new account.


Step 5.
Click Continue.


Step 6.
Put down Japan as Country of Residence, Then put in a date of birth.


Step 7.
Select the top option (Master Account).


Step 8.
Select the right option (Agree).


Step 9.
Put in an Email address, password twice, Tick the box, and then answer the question however you want.


Step 10.
Put in an Online ID (Maybe your normal online ID with JP on the end).


Step 11.
Enter the Details if you want, or you can just fill it in exactly like this.


Step 12.
This is the part people usually have trouble with. I've made it simple for you here. In the first box enter 1080023 and then click the button to the right.


If you did that, it should automatically fill out correctly. Congratulations, you now live at Tokyo Tower. Now click the bottom right icon (Next).


Step 13.
This section is about credit cards. Chances are you won't be able to use your credit card, so select the second option (No).


Step 14.
Don't tick anything just click on the bottom right (Next).


Step 15.
Click the Bottom right icon (Confirm).


Step 16.
If this option comes up, select the bottom one (No).


Step 17.
Congratulations, you can now use the Japanese Playstation Store.


There it is. Hope this helped.

Playstation Tutorials

Tutorials for the PS3, PSP and other products relating to the Playstation.